Showing posts with label EPPD1063. Show all posts

Saturday, January 8, 2022


Create a database in Access



To make a database with Access, you don't have to write code or be a database expert because you don't have to know how to do that.


In order to quickly build databases, well-designed templates help you do this quickly. queries make it easy to find the data you want quickly and quickly. Instantly make forms for easy data entry. In grouped and summary reports, sum up data. Dozens of Wizards make it easy to start and get to work quickly.


Create a database

  1. Open Access.

    If Access is already open, select File > New.

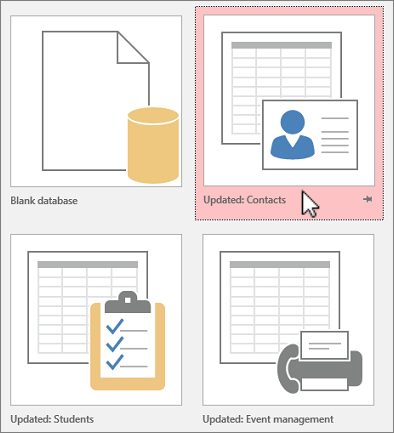
  2. Select Blank database, or select a template.

  3. Enter a name for the database, select a location, and then select Create.

    If needed, select Enable content in the yellow message bar when the database opens.


Import data from Excel

  1. Open the Excel workbook, make sure each column has a heading and a consistent data type, and then select the range of data.

  2. Select External Data > Excel.

  3. Select Browse to find the Excel file, accept the default values, and then click OK.

  4. Select Does the first row of your data contain column headings?, and then click Next.

Complete the rest of the wizard screens, and select Finish.


 Create an Excel workbook

Excel makes it easy to do math. When you use Excel, you can speed up data entry by using AutoFill. So, after that, you can get chart suggestions based on your data, and make them with just a single click. Or you can use data bars, colour coding, and icons to quickly see trends and patterns in the data.

Create a workbook

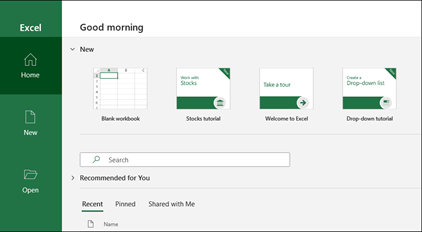
  1. Open Excel.

  2. Select Blank workbook.

    Or press Ctrl+N.


Enter data

To manually enter data:

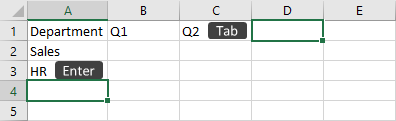
  1. Select an empty cell, such as A1, and then type text or a number.

  2. Press Enter or Tab to move to the next cell.

To fill data in a series:

  1. Enter the beginning of the series in two cells: such as Jan and Feb; or 2014 and 2015.

  2. Select the two cells containing the series, and then drag the fill handle Fill handle across or down the cells.


 What can POWERPOINT do for us?


The fundamentals of making a PowerPoint presentation

When you open PowerPoint, you'll notice that it comes with some pre-installed themes and templates. A theme is a slide design that uses similar colours, fonts, and special effects such as shadows and reflections. Select New from the File tab of the Ribbon, and then select a theme


In PowerPoint presentations, you can collaborate and share comments. 

Choose Review >  New Comment from the drop-down menu. If the Comments pane is open, you can also click New. Type your message into the box in the Comments pane and hit Enter. Select Reply from the drop-down menu and type your reply. To move between comments and slides, press the Next or Back buttons. To delete a comment, click the X in the upper corner.

Co-create PowerPoint presentations

A file's history can be viewed. Duplicate previous versions' content You can also Save A Copy of a previous version to edit it separately from the current file. rename a ppt You can rename a PowerPoint file for the web while co-authoring.


Make a video out of your presentation.


PowerPoint 2013 and newer versions of PowerPoint allow you to save your presentation as an MPEG-4 video file (.mp4) or a Windows Media Video (.wmv) file. Both formats have widespread support and are capable of being streamed over the internet. Both formats have widespread support and are capable of being streamed over the internet.

HOW TO MAKE TABLE OF CONTENT IN WORDS

You cannot generate any automatic tables unless you first use styles effectively throughout your document. Microsoft Word can scan your document and find everything in the Heading 1 style and place it on the first level of your table of contents, any Heading 2's on the second level, and so on.

If you want an automatic table of contents, you must label all of your chapter titles and front matter headings (for example, "Dedication" and "Acknowledgements") in the style. Heading 1. All major headings within your chapters should be labelled as Heading 2. All subheadings should be labelled Heading 3, and so on.


If you used Heading styles in your document, creating an automatic table of contents is simple.

  1. Make sure you put your cursor in the place where you want your table of contents to be.
  2. Insert Table of Contents from the References Ribbon. Clicking on the arrow next to the icon for the table of contents will bring up a menu. Select Insert Table of Contents....
  3. You should note that this option is called Custom Table of Contents in Word 2013.
  4. Click the Modify button to make changes to your table of contents' style. For example, if you want more space between items on Level 1 and Level 2, or you want all of your Level 1 items to be bold, click the Modify button.
  5. To change which headings show up in your table of contents, you can change the number of levels that appear in the Show levels: pull-down menu.

  6. Click OK to put your table of contents in.


The table of contents is a quick look at the headings and page numbers in your paper. It's always possible to make changes to it by right-clicking on it and selecting Update field when you want to. Make sure you notice that when you click on a table of contents, it will turn grey. This means that it is getting information from somewhere else, which is why it looks this way.